Monday

A watercoloured eye from the art journal


A-watercolured-eye-from-the-art-journal

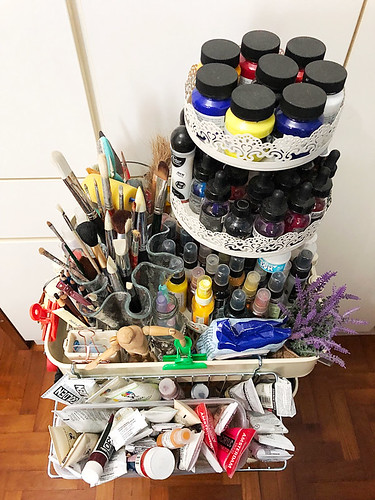
I love to bring my curated case of Holbein, Schmincke and Daniel Smith watercolours with me when I travel so that I am "forced" to use them. Now, I love my watercolours but they can be a bit trying and unforgivable when you go in with a heavy hand.


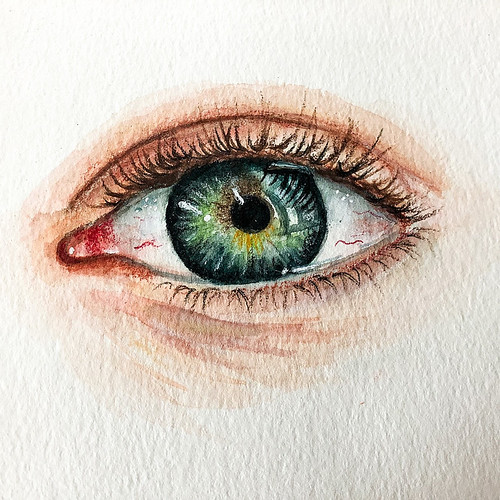
I usually start with a light pencil sketch, removing most of the graphite with a kneaded eraser so that all that is left is a light guideline of my initial sketch. Yep, watercolours do not get along with graphite. Some people do enjoy letting the graphite marks show through their watercoloured pieces though. As for me, I feel that without the obvious line markings, I can still make adjustments to my initial sketch. (You may notice that the completed eye is actually smaller than my initial sketch...because I suck at sketching! *lol*)

Then I go in with a very light wash of colours (watercolours dry much much lighter than when they are wet). Once that layer is dry, I start building up my colours. This is the stage when most people give up because it looks terrible. *winks* The key is to mix your colours on your pan rather than on your paper so you have more control of the colours. And always remove some paint on a paper towel first.

Since I only brought one travel-size brush with me, I finished off the eyelashes with coloured pencils and added white highlights with a gel pen.

P/s: What about you? What art supplies do you bring when you travel?


Share/Bookmark

Pin It

Friday

My fun family...*winks*


My-fun-family

Well, you all know that my family likes to have fun...like the other day when we were celebrating my sister's birthday. *winks*


Yep...my parents and sister are holding props. Because I made them. And the Yam family loves to have fun! *lol*


If you look closely at the cheesecake, the blueberries are not enclosed in a glaze...they were were just propped on top so that the cake looks nicer (according to mum) and we had to remove them before we could cut the cake unless we wanted the blueberries to roll off (*hahaha*).


Playing along with Stuck?! Sketches.


P/s: Happy weekend friends!


Share/Bookmark

Pin It

Thursday

One piece of fabric: 10 projects


Not sure if you've noticed but I've used this white lacy fabric on a lot of my projects. It was a piece of fabric that my mum bought years ago to make a dress but never got round to using it. There were lots of little brown spots on it so she passed it to me to use on my craft projects. Nothing a little gesso couldn't fix, right? *winks*

Here are the 10 projects I've created with this piece of fabric....

Decorated biscuit tin
The decorated biscuit tin

Mixed media canvas for my grandaunt
A pressie for my grandaunt

The-lazy-person's-wreath...
The lazy person's wreath

Pretty-envelopes
Easy to make pretty envelopes...tutorial

Mixed-media-canvas-by-Yvonne-Yam-for-Maya-Road-CHA-2016
The one where a drill was involved


The document holder got a makeover

Upcycled-storage-unit
The need to lace-cify everything

Makeup-organizer
Makeup organizer


It's-time-to-make-more-family-mixed-media-canvases
It's time to make more family mixed media canvases

Mug-shot-project-for-LESSology

Beer can turned "mug" for paintbrushes...the challenges to complete this project


There you have it...one piece of fabric: 10 projects.


Share/Bookmark

Pin It

Wednesday

Workspace Wednesday: the desk in my hotel room


Hello friends! Greetings from Ho Chi Minh City where I'm spending the week. Here's a look at my very hardworking, multi-tasking desk by the window. Gotta love a big roomy desk that allows me to spread my stuff all over it. And you know, I've a lot of stuff. *lol*


Share/Bookmark

Pin It

Tuesday

The tag with recycled elements from previous projects


The-tag-with-recycled-elements-from-previous-projects

So you know I've told you time and time again that I can never find the cards I've made when I really needed them? Well, the other day I did. They were actually neatly tucked in a box, somewhat in an organized fashion *winks*. 


I had fun looking through my old creations even though I mostly cringed at the lack of "skill" in my early crafting days (Who can relate? *lol*). Anyway, I kept some that I might actually use and recycled the elements on the rest of them....


Meet my tag with recycled elements from previous projects! ;)

P/s: Hope you are having a great week so far!


Share/Bookmark

Pin It

Friday

This cheeky kid really likes Aunt E!


This-cheeky-kid-really-likes-Aunt-E

So the other day, my nephew E (my cousin's kid) came over for a visit and for some strange reason, really really liked my sister E. Now you know that the Gangster Gang (my brother's kids) generally steer clear of scary Aunt E. *lol*


But this cheeky dude repeatedly opened the door to Aunt E's room to "see" her. 


Check out that happy face! :)


Kept this layout relatively simple...strips of patterned papers, buttons and washi tape in the same colour combo. Added some ink splatters for a little faux texture.


Playing along with Stuck?! Sketches.


Share/Bookmark

Pin It

Thursday

12 ways to decorate a mooncake box


The other day, my bloggy pal Cindy suggested that I put together a post with all the mooncake boxes I have altered thus far. So here it is....12 ways to decorate a mooncake box. :)

Fun-colour-combo-on-an-upcycled-mooncake-box
Fun colour combo an an upcycled mooncake box
An-altered-mooncake-box...tutorial
An altered mooncake box tutorial


Black-and-white-altered-box
Black and white altered mooncake box

Another-altered-mooncake-box
Another mooncake box...a tutorial


The-gold-decorated-box
The gold decorated box...a tutorial


Upcycled-mooncake-box
An upcycled mooncake box = thread box for mum


Altering-a-box
The truth about altering a box...a tutorial


Mixed-media-on-a-mooncake-box-cover
Mixed media on a mooncake box cover


Gold-box
Upcycled boxes for Blue Fern Studios


Decorated-box1
Upcycled boxes for Blue Fern Studios


Decorated-mooncake-box
The decorated mooncake box


Upcycled-box-for-Faber-Castells-by-Yvonne-Yam1
An upcycled cake box with Faber Castell Design Memory Craft Gelatos Colors

There you have it. 12 ways to decorate a mooncake box (or any sturdy box).

All projects are linked to their original posts..some of them are tutorials.


Share/Bookmark

Pin It

Wednesday

Workspace Wednesday: a look at my Raskog cart


Workspace-Wednesday-my-raskog-cart

Meet my Raskog cart. 

She probably isn't Pinterest or Instagram-worthy but after months of trying to organize my art supplies on the Raskog cart, I am finally happy with it.

Now if you have one of these Raskog carts, you probably know that you can pack quite a lot of stuff in these but of course, accessibility becomes a problem if you keep stacking stuff.

I like my art supplies within easy reach (you know when you get into the zone, you don't want to have to get up and go look for stuff right? *winks*) so all my faves are stored on the top tray of my cart. 

The 3-tier stand holds my acrylic paint tubs, my acrylic inks and my bottles of mist. A glass jug and vase hold my paint brushes. I also added a basket to store the rest of my acrylic paints. Wet tissues and several mist bottles of distilled water fill up the rest of the top tray.

The second and third trays of the cart store supplies that are not frequently used.

Do you have a Raskog cart? What do you put on yours?


Share/Bookmark

Pin It
>
Related Posts Plugin for WordPress, Blogger...

LinkWithin

Pin It