Wednesday

It's time to make more family mixed media canvases...


It's-time-to-make-more-family-mixed-media-canvases

Recent commissioned mixed media canvas pieces (like the one shown) have ignited my desire to add to my existing collection of family mixed media canvases. Especially since members of the Gangster Gang (aka nephews + niece) have grown up quite a bit. *winks*


I don't know about you...but I tend to do a LOT of something I like till I get bored.  Then I move on the next "exciting" thing. And start the cycle all over again. 


This particular mixed media canvas had me stumped for a while because I had to incorporate people from 3 different photos and if you noticed, I tend to enjoy doing  "scenes" on my mixed media canvases involving people. 


So I went with a multiple photo scrapbook layout style instead.


The silhouette photos were "popped" up for a more dynamic feel.


The 12 x 12 canvas was covered with wrapping tissue and remnant lace before being misted with shimmering sprays. I finished with really eye-popping embellishments and bling since the recipient was a lady. :)


Share/Bookmark

Pin It

Monday

The tag that caused a lot of pain...


The-tag-that-caused-a-lot-of-pain

Meet the tag that caused me a lot of pain. And possibly a scar on my left calf. 


Yep, I went into battle with my hot glue gun and it won. [cue super sad music] See that pretty blue flower? Well its evil twin (loaded with hot glue) decided to slip from my fingers, burn my left thumb and make a spectacular landing on my left calf. Ouch! 


But at least the tag turned out pretty right? *winks*


Share/Bookmark

Pin It

Thursday

Quick paper bags with found objects...a tutorial


Quick-paper-bags-with-found-objects

I realized that my arsenal of decorated paper bags did not include ones for the gentlemen in my life - I'm pretty certain they will feel a little weird lugging bags with cute critters on them or flowers and bling. *LOL*


1. Choose some neutral/masculine print patterned papers and cut to fit bag. I went with a dark gray plaid for the bigger bag and a tape measure patterned print for the smaller one.

2. Next I dug into my "save-it-for-a-rainy-day" box for some found items to decorate my paper bags. 


3. I went with washers and tab pulls and used brown ribbons for the handles.


4. I also used a leather strap from an old pair of mules.


5. I added brown washi tape to create a border around the edges for a more finished look.


There you have it, quick paper bags with found objects for the gentlemen in your life. :)


Share/Bookmark

Pin It

Tuesday

The story about the cheese tarts


The-story-about-the-cheese-tarts

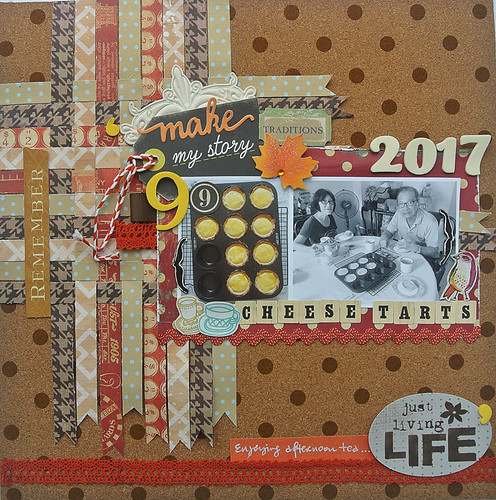
So two Saturdays ago, I tried my hand at baking some Japanese-inspired baked cheese tarts. Apparently, the Japanese have got the perfect formula for creating the most delectable cheese tarts which you can eat in several ways - 

1. Fresh out of the oven with soft centers of lava cheese oozing out.
2. Chilled so the cheese custard tastes like soft-serve ice-cream.
3. Room temperature - gooey, creamy and delicious.


Like with most of my baking adventures, I researched extensively online for the most "doable" recipes and then tweaked them to suit my needs. I have only been baking for a year but I find that reducing sugars by at least 1/3 and up to 1/2 of the original recipes doesn't affect the actual baking. Once you reduce the sweetness, you can better taste the other flavours in your baked products [You should see nephew #2's face when he ate my lemon curd tart...I was sure he would give up eating it since it was really tangy...but it seems he now has a better appreciation of lemons...*winks*].


Even though I have amassed quite a bit of baking equipment in the last year, apparently I didn't invest in individual small tart tins or pastry cutters. *LOL* So I weighed the dough, rolled them as evenly as I could and then stuffed them in my muffin tray. And hoped for the best.


I was supposed to blind bake the tart shells, take them out of the tray, add in the cheese custard and then bake them till they turn a nice toasty brown.

Of course, the tart shells were too delicate to come out of the muffin tray (errr...I didn't grease the tray) so I had to fill them up with the cheese custard and send them off for the final bake with my fingers crossed. *LOL*


They came out smelling soooooooo good. But of course, there was THE problem of actually getting them out of the muffin tray. The Gangster Gang (niece + 3 nephews) were all set with their spoons to eat those cheese tarts out of the muffin tray. *picture the scene with your mind's eye...hehe*

But the tart shells shrank as they cooled and with the added weight of the cheese custard, I was able to get the cheese tarts out of the muffin tray totally intact! Yay! :)


But the good fortune didn't last long. Everyone wanted one and refused to share. So my sister and I didn't even get to eat the cheese tarts except for some crumbs left by the niece.... :(  So I baked more the very next day. These photos were actually taken from the second bake because with all the drama, I didn't manage to take any photos! *LOL*

And that is the story about the cheese tarts....my little baking adventure..hehe. 

Playing along with Stuck?! Sketches.


Share/Bookmark

Pin It

Monday

A fall-inspired tag


A-fall-inspired-tag

Hello friends! I'm currently working on using up my chipboard stash (yay, go me!). My chipboard collection gets quite a bit of usage first as "stencils"  for my mixed media projects before they end up as dimensional pieces on my projects. Do you do that too?


As always, my tag base is cardboard from packaging. I glued 2 pieces together for a sturdy base before covering the front and back with paper scraps and painting with a layer of gesso. 


When the gesso layer was dry, I went in with some mists in fall-inspired colours.


And since I was playing along with the Fall Coffee Lovers Blog Hop, I had to add in my Maya Road wood token with a coffee cup, nestled between fall leaves.  *winks*


I finished off with a Maya Road diecut hello and some pretty trim.


These are some of my fave colours to use on projects and I love how it turned out - perfect for adorning a gift bag of coffee beans, tea bags or hot chocolate.


Happy week ahead friends!


Share/Bookmark

Pin It

Thursday

Ideas for double page spreads


I don't do many double page spreads even though I really enjoy the challenge of putting them together. Double pagers are great when you have lots of photos to incorporate and the usual 12 x12 page is not big enough. Or when you have uncoordinated photos related to a specific event/activity. Here are some ideas for double page spreads. 

Travel-journal-double-page-spread
Double page spread for Blue Fern Studios

1. Use a repeated motif as a unifier.

You don't have to use the same background patterned papers for both pages. Here I used those fussy-cut blooms to unify my pages.

SRM-double-page-spread
The double page birthday spread
2. Make your own patterned backgrounds.

Can't find coordinating papers? Create them yourself with the help of some mists and stencils.


Thailand1
A double-pager
3. Let your title work span across the two pages.

This was one of those single-page layouts that turned into a double-pager because I did not have enough space to fit all my printed photos. Hence, more photos on the left-facing page..hehe. But I managed to find a similar chevron patterned paper and used the title work to unify the two pages.

Shenaningans
Yam shenanigans

4. Mirror your pages.

Well, sort of. At least the photo mats? *winks* I also carried my title work across the two pagers. But as you can see, using the same patterned paper background on both pages already trick the eye into seeing the two pages as one unit.

Layout-by-Yvonne-Yam-for-Maya-Road-and-Simple-Stories-blog-hop
Double page spread for Maya Road/Simple Stories swap

5.  Take your embellishments across the two pages.


Here, I used the twine, lace trim, clouds and wood embellishments to unify the two pages.

Double-page-spread-for-Maya-Road-Photoplay-swap-by-Yvonne-Yam
Double page spread for Maya Road Photo Play Paper swap
6. Coordinate with similar colours across both pages.

Keep to coordinating colours to tie your pages together. On this double-pager, I kept to the main colours of red, green and silver on both pages. The fussy-cut banners across both pages also helped to create a cohesive double-pager.

So there you have it. 6 ideas you can use for your double page spreads. Will you try them out?


Share/Bookmark

Pin It

Tuesday

A mixed media canvas that lights up...


A-mixed-media-canvas-that-lights-up

So the other day I was commissioned to do a mixed media canvas as a farewell gift for a dude. There were a couple of requirements:

1. Must incorporate photo of dude on motorbike and make him look "cool".
2. Must incorporate multiple photos that are not related to each other. 
3. Must have bling but not the girly kind.

And my own requirements was to upcycle as many things as I can from my stash for this project. *winks*


Well, the dude on the bike would have been easier to incorporate if the photo had included the whole bike and his foot. But the back of the motorcycle and his foot were not in the original photo. *insert dramatic music that signals trouble*

Fortunately, I keep lots of "junk" like old toy parts. Unfortunately, the toy tyre was a tad bigger than what I needed so I did a bit of optical illusion by angling the bike....and hiding his missing foot in a cloud of exhaust fumes [aka white feathers...hehe]. Did my optical illusion work?


Given that I could NOT use my usual ammunition of floral blingy glittery stuff as embellishments,  I thought it would be fun to add some battery-operated LED lights so that the group photo is like a billboard.  Which kind of works with all the computer cables I used. *I think?*


So the main group photo was housed in a black plastic packaging case [I knew I kept it for a reason...hehe] which can be lifted up to incorporate the unrelated group photos. 


Even the title work was from hard foam from old packaging. I threw in some buttons and nuts as my "bling".


Now the recipient can just prop up this canvas on his desk and use it as a light source at night.  :)

What do you think?


Share/Bookmark

Pin It

Monday

Working off the cheese tart at the playground


Working-off-the-cheese-tart-at-the-playground

Saturdays are my baking days. Because I have official and discerning food tasters (nephews + niece) who LOVE everything I make... *winks*


Of course, I make sure my food tasters stay in shape too. Like working off the cheese tart at the playground last Saturday. Yep, I feed them, then make them sweat it out! *LOL*


And yes, I'm now working on my Echo Park Paper fussy-cut bird collection...;)


I had lots of fun fitting in little fussy-cut elements like the plane and monster. 


Playing along with Stuck?! Sketches.


Share/Bookmark

Pin It
>
Related Posts Plugin for WordPress, Blogger...

LinkWithin

Pin It